Views: 0 Author: Site Editor Publish Time: 2026-10-15 Origin: Site


Ordering the wrong replacement bags causes immediate headaches for maintenance teams and facility managers. Particulate bypass ruins clean air plenums and wrecks downstream blowers. When bags fail early, you face unexpected shutdowns, potential EPA emissions violations, and massive facility downtime. The core problem is that used bags stretch, shrink, and warp under heavy operational stress. Heat, moisture, and constant pulse-jet cleaning change the fabric structure entirely. Trying to pull accurate baseline measurements from a retired, deformed filter often yields bad data.
Capturing precise dust collector filter bag dimensions demands a strict, methodical approach. You have to evaluate the bag, the supporting cage, and the tubesheet as a complete system. Relying on one blown-out sample guarantees an incorrect replacement order. Cross-referencing these three hardware components is the only way to ensure your new filters match the exact system specifications and perform reliably under load.
Flat Width vs. Diameter: The most critical measurement error is confusing flat width with diameter. Flat width must be converted using a specific formula to find the true diameter.
The Three Critical Dimensions: Every successful replacement relies on accurately capturing the top configuration (e.g., snap band size), the flat width, and the overall length.
Configuration Matters: Top-load and bottom-load systems require different measurement focal points, particularly regarding snap bands and raw edges.
Cage Tolerance: A dust collector filter bag cannot be sized in isolation; its dimensions must account for the exact diameter and length of the supporting cage to prevent flex-fatigue.
Tubesheet Verification: Measuring the physical tubesheet hole is the ultimate failsafe to verify snap band and top-configuration dimensions.
Table of Contents
A perfect fit achieves specific mechanical goals inside your baghouse. It maintains the engineered air-to-cloth ratio, allowing the system to handle the required cubic feet per minute (CFM) of airflow. It enables the pulse-jet cleaning system to knock dust cakes off the media effectively. Most importantly, it guarantees zero dust migration into the clean air plenum. Hitting these performance metrics requires strict adherence to exact sizing.
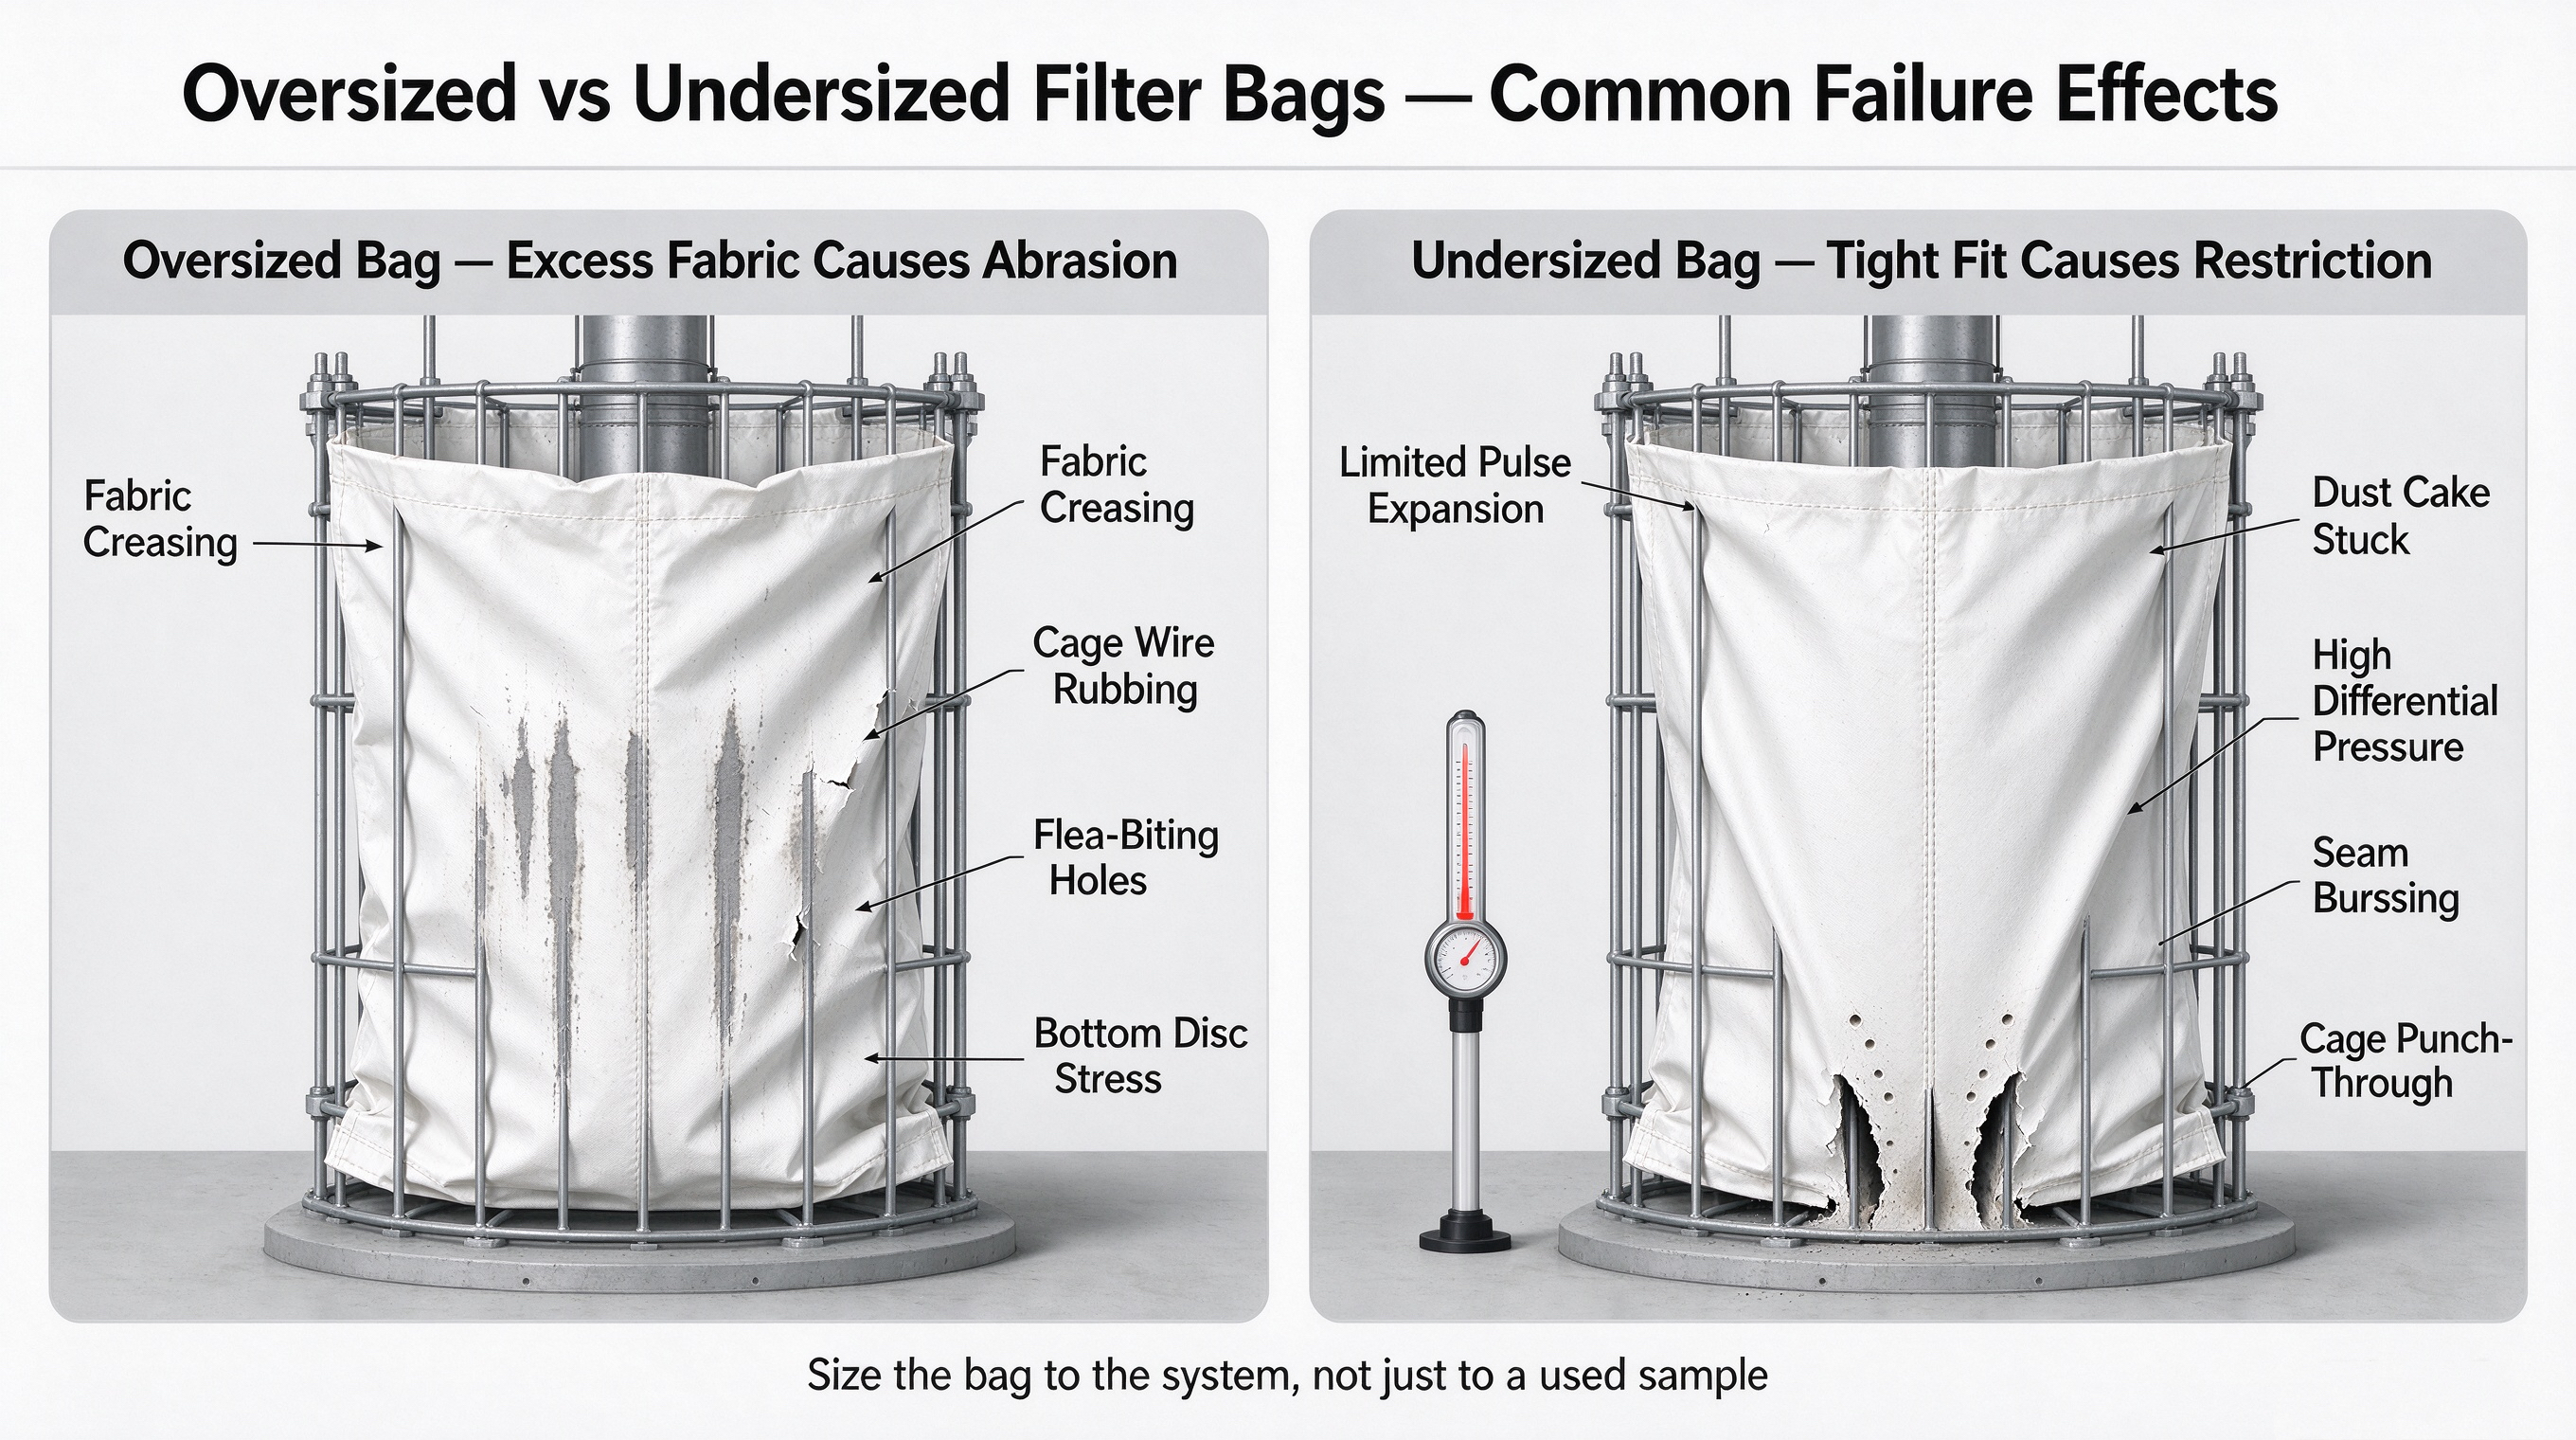
Excess material destroys filter media rapidly. When a bag is too wide, the fabric folds and creases around the supporting metal cage. During a pulse-jet cleaning cycle, a blast of compressed air expands the bag outward. The fabric then violently snaps back against the cage wires. Oversized bags rub continuously against these wires during this cycle. This rapid mechanical abrasion creates a failure pattern known as "flea-biting"—tiny holes and tears along the vertical wire lines. Particulate immediately bypasses the filter through these breaches.
Oversized length causes similar catastrophic failures. If the bag extends too far past the cage bottom, the excess fabric gets sucked upward into the cage interior by the airflow. This creates severe stress on the bottom disc seam, leading to structural failure and massive dust leaks into the hopper.
Undersized bags create immediate airflow restrictions and installation nightmares. Bags that fit too tightly around the cage cannot expand properly during the pulse cleaning cycle. The compressed air shockwave fails to flex the fabric, meaning the accumulated dust cake remains stuck to the outside of the bag. This leads to high differential pressure across the system. The main draft fan works harder to pull air through the blinded media, drawing excessive amperage.
Tension also forces seam bursting under normal operating loads. If the bag is too short, the cage will punch directly through the bottom disc. The weight of the dust cake combined with downward airflow forces the cage downward, destroying the tight fabric instantly upon startup.
Improper fit directly impacts facility operating budgets. High differential pressure increases fan energy consumption significantly. Furthermore, bypass leaks caused by mechanical wear lead to failed emissions testing. Regulatory fines for exceeding particulate matter limits on Title V permits severely impact operations. Precise sizing prevents these cascading mechanical and regulatory failures.
Handling used industrial filters carries inherent safety hazards. Dusts collected in these systems can be toxic, highly combustible, or chemically hazardous. Proper preparation prevents injury and ensures your measurement data remains accurate.
Never handle used filter media without reviewing the Safety Data Sheet (SDS) for the collected particulate. Combustible dusts like grain, sugar, or wood flour require grounding protocols to prevent static discharge. Toxic dusts like silica or heavy metals require strict respiratory protection. Specify necessary protective gear before opening the baghouse doors. Wear properly fitted respirators equipped with P100 cartridges. Use heavy-duty nitrile gloves to protect against dermal exposure. Wear disposable Tyvek suits to prevent particulate from contaminating your clothing. Ensure all lockout/tagout (LOTO) procedures on the fan and pulse valves are complete before accessing the collector.
Do not measure the most damaged or deformed bag in the collector. Bags positioned near the inlet baffle often suffer from severe abrasion and stretching due to high-velocity dust impact. Bags near the outer walls may suffer from moisture-induced shrinkage if the collector housing has insulation leaks. Select a relatively intact bag from the center of the module. Ideally, pull and measure two or three bags from different locations to calculate an average baseline.
Used bags carry heavy dust cakes. You must remove this accumulation before taking measurements. Gently shake out or vacuum the heavy dust cake from the sample bag. Do not aggressively beat the fabric against a rail, as this stretches the material. Excess dust prevents the bag from laying truly flat on a surface. A bulky dust cake artificially inflates the flat width measurement, leading to an oversized replacement order.
Gather the correct measurement tools before beginning the teardown. You will need:
A flexible tailor’s measuring tape (for flat width and circumferences).
A rigid steel tape measure (for overall length).
Digital calipers (for precise tubesheet and snap band measurements).
A clean, flat measuring surface (large enough to support the entire 10-foot or 12-foot bag length).
A camera or smartphone for visual documentation.
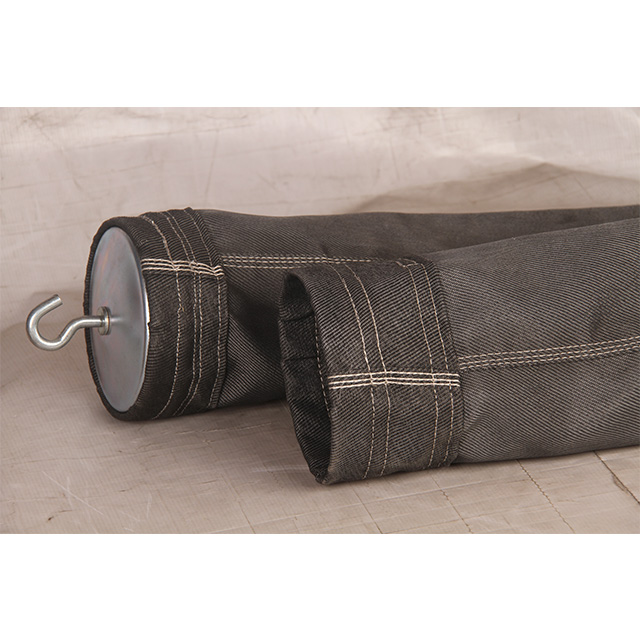
Capturing accurate data requires a methodical approach. Follow these exact steps to extract the specifications required by filter manufacturers.
Lay the cleaned bag completely flat on your clean measuring surface. Smooth out all wrinkles carefully. Do not stretch the fabric laterally. Place the flexible tailor's tape straight across the width of the flattened bag. Record this measurement down to the nearest 1/16th of an inch.
Never attempt to measure the diameter of a flexible, used cylinder directly. The fabric sags, distorts, and yields inaccurate readings. Instead, use the flat width to calculate the exact diameter. Provide this essential conversion formula to your maintenance team:
(Flat Width x 2) ÷ 3.1415 = Bag Diameter
Measured Flat Width | Multiplied by 2 | Divided by Pi (3.1415) | Final Calculated Diameter |
|---|---|---|---|
7.50 inches | 15.00 | 3.1415 | 4.77 inches |
9.25 inches | 18.50 | 3.1415 | 5.88 inches |
10.00 inches | 20.00 | 3.1415 | 6.36 inches |
Manufacturers rely entirely on this calculated diameter to size the replacement correctly. Providing just the flat width without clarifying it can lead to massive sizing errors if the manufacturer assumes you provided the diameter.
Fabric skews over time. Always measure along the longitudinal seam to maintain a straight line. The starting point depends entirely on the top configuration.
For snap band bags: Locate the center of the snap band. This is the groove where the band seats directly onto the tubesheet. Start your rigid tape measure exactly at this groove. Measure down to the absolute bottom of the bag, including the bottom disc. Do not measure from the top edge of the snap band flange, as this adds incorrect length.
For raw edge bags: Start the measurement from the absolute top edge of the fabric. Measure straight down the seam to the bottom edge. Maintain tension on the tape measure, but do not stretch the used fabric.
For ring top bags: Start measuring from the top of the metal ring down to the bottom seam.
Identify the specific top type. Common configurations include Snap Band, Ring Top, Raw Edge, and Corded tops. Snap bands require the most precise measurements because they form the primary seal between the dirty and clean air plenums.
For Snap Bands, use your digital calipers. Measure the Outer Diameter (OD) of the band in its natural, relaxed state. Measure the Inner Diameter (ID) of the band. Next, measure the groove width. The groove width must perfectly match the thickness of your tubesheet. If your tubesheet is 1/4-inch thick, the groove must accommodate that exact thickness. If you install a bag with a 1/4-inch groove into a 3/16-inch tubesheet, the bag will fit loosely and leak dust immediately.
Identify the bottom construction type. Standard options include Disc bottom, Envelope, or Wear Strip designs. Measure the depth of the bottom disc. If the bag features reinforced wear strips, measure the height of these strips. Wear strips protect the lower portion of the bag from heavy abrasion as dust swirls in the hopper. Accurate wear strip dimensions ensure the reinforcement covers the correct vulnerability zone, usually the bottom 2 to 4 inches of the bag.
Numbers alone often leave room for interpretation. Visual evidence eliminates ambiguity. Take clear photographs of the measuring tape laid across the flat width. Photograph the tape measure running along the overall length. Take extreme close-up photos of the top and bottom configurations. Ensure the tape measure is visible in these close-ups. Include these images in your Request for Quote (RFQ). This visual proof allows the manufacturer to verify your measurements and identify specific construction techniques like double-stitching or specific flange shapes.
Baghouse design fundamentally dictates your measurement priorities. Top-load and bottom-load systems interface with the collector differently. You must adjust your focus based on the system architecture.
Top-load systems require you to focus heavily on the snap band and tubesheet interface. The seal happens at the top plate, and you access these bags from the clean air plenum. Use digital calipers to measure the physical tubesheet hole diameter. Take measurements at the 12-to-6 o'clock position and the 9-to-3 o'clock position. Compare these two numbers. If they differ significantly, the hole has elongated due to metal wear or corrosion. A perfectly round snap band will not seal in an oval hole.
The snap band relies on internal spring tension. It must compress to fit through the hole and "snap" outward to lock into place. If the calculated bag diameter is too small, the band lacks the tension required for an airtight seal. Dust will bypass the filter immediately.
Bottom-load systems shift the focus to the raw edge, strap, and clamp interface. You access these bags by crawling into the dirty air plenum or hopper. These bags slip over a metal collar at the bottom of the collector. Measure the outside diameter of the thimble or cell plate collar. The bag must be slightly larger than this collar to slip over it smoothly.
Determine the required overlap length. The bag needs enough excess fabric at the bottom to accommodate a stainless steel hose clamp. Measure the width of your existing clamps to ensure the raw edge provides sufficient clamping surface area. If the overlap is too short, the clamp will slip off during the first pulse cycle.
A dust collector filter bag shares a symbiotic relationship with its structural support. You cannot size a bag accurately without evaluating the cage.
The difference between the cage outside diameter and the bag inside diameter is called the "pinch tolerance." This clearance is critical for pulse-jet cleaning. Proper pinch allows the fabric to flex outward during the pulse and snap back against the cage, dislodging the dust cake.
Filter Media Type | Fabric Weight | Recommended Pinch Tolerance |
|---|---|---|
Standard Polyester Felt | 16 oz | 1/8" to 3/16" |
Heavy PTFE Laminated Felt | 22 oz | 3/16" to 1/4" |
Woven Fiberglass | 14 oz | 1/16" to 1/8" |
Aramid (Nomex) | 14 oz | 1/8" to 3/16" |
Heavy woven fiberglass requires a tighter pinch than lightweight polyester because fiberglass yarns will break if allowed to flex too violently. Always verify the cage outside diameter with calipers before finalizing the bag diameter.
The bag must always be slightly longer than the cage. Usually, manufacturers design the bag to be 1/2-inch to 1-inch longer than the metal support. During operation, the dust cake adds significant weight to the fabric. Downward airflow pulls the bag tight. If the bag and cage are the exact same length, this operational stress forces the bottom of the cage to punch through the fabric disc.
Inspect cages thoroughly before measuring them. Cages warp, bend, and rust over time. Measuring a bent cage yields inaccurate diameter and length data. Furthermore, installing a perfectly sized new bag on a damaged cage guarantees immediate failure. Broken wires, sharp burrs, or heavy pitting will shred the new fabric within hours of startup. Replace damaged cages simultaneously with the bags to protect your investment.
Dimensions represent only part of the specification. Material behavior under operational stress impacts the final fit. You must account for physical changes in the fabric based on your specific process environment.
Different materials react differently to high operating temperatures. Standard Polyester handles temperatures up to 275°F. Aramid (Nomex) withstands up to 400°F. PTFE operates safely up to 500°F. Continuous exposure to these temperatures causes fabric shrinkage. Manufacturers build specific shrinkage allowances into the bag length based on your provided dimensions and operating temperature. You must provide the maximum operating temperature in your RFQ so the manufacturer can calculate this allowance accurately. If you omit this data, a bag designed for 200°F will shrink violently when exposed to 350°F, tearing itself off the tubesheet.
Transitioning to a different filter media changes the internal diameter requirements. Moving from a standard 16 oz polyester felt to a heavier PTFE-laminated felt increases the fabric thickness. This thicker media consumes more space between the cage and the bag exterior. You must adjust the internal diameter slightly to maintain the required pinch tolerance. Failing to account for media thickness results in bags that are impossible to slide over the cages during installation.
Seam type affects the structural rigidity and the flat-width measurement. Welded seams fuse the material together, creating a stiff, impenetrable bond. Stitched seams use high-tensile thread, offering slightly more flexibility. Welded seams often require tighter manufacturing tolerances because the fabric cannot stretch at the joint. Specify your current seam construction when providing dimensions to ensure the replacement behaves exactly like the original.
Field measurements often contain hidden inaccuracies. Understanding common pitfalls prevents costly ordering mistakes. Use the following strategies to mitigate implementation risks during your next outage.
Common Measurement Error | Operational Consequence | Mitigation Strategy |
|---|---|---|
Measuring a bag shrunk by moisture or heat excursions. | Replacement bags arrive too short or too tight, causing installation failure. | Always cross-reference bag measurements with physical cage and tubesheet dimensions. |
Including the snap band flange in the total length measurement. | Bags are manufactured too short, causing the cage to punch through the bottom. | Measure strictly from the center groove of the snap band to the bottom disc. |
Assuming all bags in a multi-module baghouse are identical. | Mixed bag lengths cause uneven airflow and localized premature wear. | Sample bags from different modules to verify uniformity before placing a bulk order. |
Measuring flat width over a heavy, uncleaned dust cake. | Calculated diameter is artificially inflated, resulting in oversized bags that chafe. | Thoroughly vacuum or shake out the sample bag so it lays completely flat. |
Using a stretched cloth measuring tape. | Inaccurate flat width readings lead to incorrect diameter calculations. | Use a new, calibrated tailor's tape for fabric and a rigid steel tape for length. |
Accurate measurement of a dust collector filter bag is a multi-point verification process. You cannot rely on a single data point from a deformed used filter. You must cross-reference the bag, the cage, and the tubesheet to ensure operational success. Implement the following action steps to secure the correct replacement filters:
Document the three critical dimensions on a standardized sheet: flat width (and calculated diameter), overall length, and exact top/bottom configuration types.
Measure the physical tubesheet holes and cage dimensions with digital calipers to verify the bag data.
Compile all measurements and clear visual documentation into a comprehensive RFQ document.
Consult with a specialized filter manufacturer to verify pinch tolerances and material shrinkage allowances based on your specific operating temperatures before authorizing production.
A: Lay the bag completely flat without stretching the fabric. Measure straight across the width. Multiply that flat width measurement by two, then divide the result by Pi (3.1415). This formula provides the exact calculated diameter required by manufacturers to size the replacement correctly.
A: The three critical dimensions are the flat width (used to calculate diameter), the overall length, and the exact measurements of the top configuration. For snap bands, this includes the outer diameter, inner diameter, and the groove width.
A: Standard manufacturing tolerances depend on the material used. Typically, acceptable tolerances are +/- 1/8 inch for the bag diameter and +/- 1/2 inch for the overall length. Tighter tolerances may be required for specialized heavy PTFE laminates.
A: Use digital calipers to measure the outside diameter and inside diameter of the band in a relaxed state. Measure the groove width, which must match your tubesheet thickness exactly. Verify these numbers by measuring the physical tubesheet hole.
A: Yes. Heavier materials, like PTFE-laminated felts, require different cage clearances to maintain proper pinch tolerance. Additionally, high-temperature materials like Aramid require specific shrinkage allowances built into the overall length by the manufacturer.
A: You must measure both. The cage dictates the internal diameter requirements and the minimum length. The tubesheet dictates the top configuration. Cross-referencing the bag against the cage and tubesheet prevents ordering errors caused by shrunken or stretched samples.
A: A bag that is too tight usually results from an incorrect flat width measurement. This often happens if the original sample bag was measured while still caked with heavy dust, preventing it from laying flat, or if thermal shrinkage was not accounted for.